Wednesday, August 21, 2019

How to create and send self-destructing emails on Gmail?

Want to send an email that deletes automatically from the recipient’s inbox? Use Gmail’s automatically self-destructing emails. Confidential Mode in Gmail allows you to set an expiration for the emails. The feature is available on both, Gmail website (mail.google.com) as well as on Gmail mobile app. That means like other settings you don’t need to open your Gmail account in a browser to send self-destructing emails. Along with sending self-destructing emails, Confidential Mode also makes your email unable to forward, download, copy-paste, and as well as print. However, the receiver can still capture a screenshot or photo of your message.

1.   Start Google Chrome or your preferred browser.
2.   Search for Gmail or directly go to ‘mail.google.com’ to open Gmail. In Chrome, you can also click the Google apps (grid) icon near the upper side of any new tab and select ‘Gmail.’
3.   Sign in to Gmail, if you aren’t already.
4.   After that, click on ‘Compose’ button in the left column to create a new message.
5.   When the new message window opens, click on the ‘Lock and clock’ button at the bottom. Doing so enables the confidential mode and opens the Confidential mode dialog box on the screen.
6.   Click the SET EXPIRY dropdown button and choose when you want the message to expire.

7.   After that, tweak other settings for the message and click on the ‘Save’ button.
8.   Now, compose your email as you usually do.
In case, you change your mind and want to send the standard message, then click the ‘Lock and clock’ button again to turn off confidential mode. Or, click the ‘X’ icon in the box appearing under the message body. If you want to change the expiration date or other settings, click ‘Edit.’
9.   When you’re done, click ‘Send.’
Your email will be sent to the receiver and delete itself automatically on the expiration date you’ve chosen for it. The timer starts immediately, as you hit the ‘Send’ button, either the recipient opens your message or not, it will delete when the time ends.
 How to create and send self-destructing email from Gmail app
These steps apply to Android but will be very similar in iOS. If you want to send a confidential message with your mobile, then here is how.
1.   Start ‘Gmail app’ in your device.
2.   Sign in to Gmail, if you aren’t already.
3.   Your Gmail inbox is displaying on your phone screen, click on the ‘+’ button near the lower right side of the display to compose a new message.
4.   In the message composing screen, click on the ‘More’ option button and select ‘Confidential mode.’
5.   Confidential mode settings will now open your screen, make sure the feature is enabled.

6.    After that, open the Set expiration dropdown to choose the expiration date for your message.
7.   Tweak other settings for the message and click on the ‘Save’ button at the top.
8.   Now, compose your email as you usually do.
9.   And click ‘Send.’
You’ve successfully created and sent a self-destructing email through Gmail.
Anna Mathew, writer of this blog loves to write and create awareness related to day-to-day internet threats. Major topics of her interest are Printer support like Lexmark Printer Support, Canon Printer Support, HP Printer Support etc.

Wednesday, August 14, 2019

How to fix common errors in Google Chrome?


Chrome is amongst the most popular browsers. Made by the tech giant Google, this browser has amazing UI, simplistic design, and offers several extensions. However, sometimes, you may face certain problems. In this blog, we will be discussing some of the most common problems faced by Google Chrome users and the ways to fix them.
Common Fixes
If you are facing common Google Chrome errors, then you can apply some basic fixes. You need to follow the steps given below.
·         First, you have to reboot your computer to make Google Chrome run faster.
·         If your page does not load properly or the router is not working correctly, then you have to check your internet connection.
·         After that, you should ensure that your system supports Google Chrome.
·         If you download a lot of stuff online, then you should check your computer, it may have a virus.

Update Chrome
You can update your Google Chrome. Here are the instructions to do so.
·         Firstly, you have to launch Google Chrome on your device.
·         After that, you should click on the vertical ellipsis menu icon.
·         Then you have to choose “Help” from the drop-down menu.
·         Thereafter, you should click on “About Google Chrome.”
·         When the updates are available click on Update.


·         After installing, when the prompt comes, click on “Restart Chrome.”

Quit Unresponsive Tabs
If you are facing common Google Chrome errors, then you can just quit unresponsive tabs. You need to follow the steps given below.
·         Firstly, you have to launch Google Chrome on your device.
·         After that, you should click on the vertical ellipsis menu icon.
·         Then you have to choose “More Tools” from the drop-down menu.
·         Thereafter, you should click on “Task Manager” from the pop-up menu.
·         Later, choose tabs that you want to close.
·         Now, you have to click on “End Process.”

Disable Extensions
You can disable extensions on Google Chrome. Here are the instructions given below.
·         Firstly, you have to open Google Chrome on your device.
·         After that, you should click on the vertical ellipsis menu icon.
·         Then you should choose “More tools” from the drop-down menu.
·         Thereafter, you have to click on “Extensions” from the pop-out menu.
·         Later, you should locate the extension to disable it.
·         Now, you have to untick the box of “Enabled” near the extension.

Delete Cookies and History
If you are facing common Google Chrome errors, then you can delete cookies and history. You need to follow the steps given below.
·         Firstly, you have to open Google Chrome on your device.
·         After that, you should click on the vertical ellipsis menu icon.
·         Then you have to click on “Settings” from the drop-down menu.
·         Thereafter, you should move down and click on the “Advanced” option.
·         Later, you have to click on “Clear browsing data” in “Privacy and security” options.
·         Now, you have to ensure that all boxes are ticked in the window.
·         After that, click on the box of “Clear the following items from.”
·         Then, you should click on “the beginning of time.”
·         Thereafter, you have to click on “CLEAR BROWSING DATA.”

Reset Google Chrome
You need to reset Google Chrome. Here are the instructions given below.
·         Firstly, you have to open Google Chrome on your device.
·         After that, you should click on the vertical ellipsis menu icon.
·         Then you have to click on Settings from the drop-down menu.
·         Thereafter, you should move down and click on “Advanced.”
·         Later, you have to go down and click on “Reset.”
·         Now, when the prompt comes, click on “RESET.”

Anna Mathew, writer of this blog loves to write and create awareness related to day-to-day internet threats. Major topics of her interest are Printer support like HP Printer Support, Brother Printer Support, Dell Printer Support etc.

Wednesday, August 7, 2019

How to disable Bixby on Samsung Galaxy S phones?


Samsung has provided an additional physical key to its modern phones. The extra button mostly appears in the Samsung Galaxy S series. It is not easy to judge what is provided for. If you hit it, a digital smart assistant “Bixby” will appear on display. If you ask it to tell you something, it will answer you just like Google Assistant, and Siri does. Samsung is trying to make its own smart intelligence digital assistant like Alexa and Siri. However, many users are facing problem due to this feature and are trying to turn it off. If you want to turn off the Bixby on your Samsung smartphone, then you have come to the right place. Here’s how to turn off Bixby on Samsung Galaxy S phones?
How to Sign Up or Sign In for your Bixby Home?
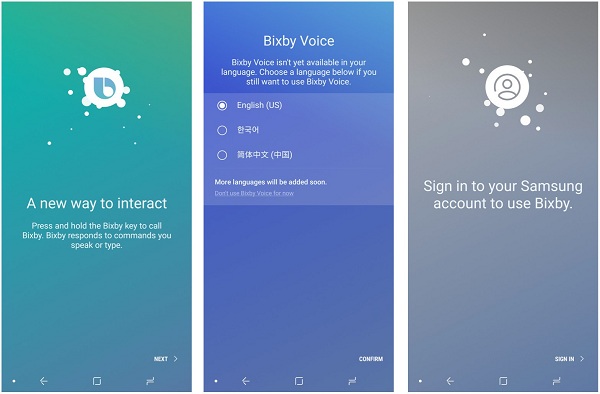
At first, we need to make sure that we are signed in to our Samsung account. If you haven’t created a Samsung account yet, then you have to make it now in order to turn off the Bixby key. Let’s learn how the process of signing up in Samsung account goes.
1.       Hit the Bixby button or swipe towards right side on the display of your device to bring up the Bixby Home screen.
2.       Now select the language you like and then tap either option “Sign in” or “Create a new account.”
3.       After that follow and fill up the required details and you are done.


Say Goodbye to Your Bixby- Let’s Disable It!
In your device, there are only two functions that work by tapping the Bixby button: one is known as Bixby, and the other is Bixby Voice. If you turn them both off, then your Bixby key would be useless and become dead. It is the best way to get rid of the Bixby button. Let’s learn to disable both functions step by step.

How to Disable the Bixby Home’s Button Shortcut?
1.       Hit the Bixby key on your Samsung smartphone to access the feature.
2.       Now navigate to the gear button which is situated at the top of your screen.
3.       You will now be redirected to the Bixby settings.
4.       There you have to tap the toggle switch to disable the Bixby Home shortcut key.
Now you won’t be directed to the Bixby home screen after tapping the key.
How to Turn Off Bixby Voice Feature on your Samsung Galaxy S Series?
1.       First, navigate to the Bixby Home screen, by swiping towards the right direction on your phone’s screen.
2.       Now press the Three Dots located on top-right of the device.
3.       There you will have to choose Settings.
4.       After that, inside the Voice section press the Bixby Voice toggle switch to turn off the Bixby Voice feature on your smartphone.
There you have it, and now the additional switch will not irritate you anymore.
Anna Mathew, writer of this blog loves to write and create awareness related to day-to-day internet threats. Major topics of her interest are Printer support like HP Printer Support, Canon Printer Support, Lexmark Printer Support etc.